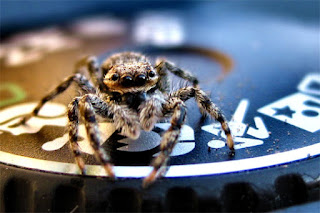
Macro is a great area of photography as you can take macro shots where ever you are. Find small details of larger objects to create abstract looking images, or maybe you want to take pictures of creepy crawlies like spiders and beetles or maybe close ups of flowers.
Depending on your budget and the type of camera you use, there are many ways to achieve a suitable magnification for close up images. The ideal solution is an SLR or dSLR with a dedicated macro lens. This lens will have the 1:1 capability built in and the lens will be good quality designed for this purpose. These lenses can be expensive though, costing several hundred pounds new, although there are a few bargains to be had via auction sites like ebay. Having the all in one solution reduces the hassle and you can concentrate on taking the picture.
An alternative to a dedicated macro lens is to use extension tubes. These go between the camera body and the lens on an SLR or dSLR, they don’t have any glass in them, but they allow you to focus a lot closer than the standard lens would normally. So let’s say you had a good quality 50mm lens, but it didn’t focus particularly close so you couldn’t use it for close up work. If you added 50mm of extension tubes between the body and the lens, effectively moving the lens 50mm further away from the sensor you would get a 1:1 magnification ratio and would be able to focus very close to the subject. You don’t want to add too much extension though as it can put extra strain on the lens and lens mount.
A cheaper way to achieve close up capability is to use the various diopters that are available to screw onto the front of your lens. These are like the filters you buy, such as UV filters or polarisers, but are designed to allow closer focus. You can also stack these, so maybe you want a +2 and a +4 to get really close up, or you could just use the +2 on it’s own. You have to remember though that each one you add to the front of the lens adds an extra piece of glass. Too many extra pieces of glass can have a detrimental effect to your image, so don’t go mad with them. It is a cheap option though, especially if you can find them in a camera shop’s bargain bin!
Another way to achieve good macro capability is to reverse one lens onto the front of another lens. So if you already have a decent 200mm lens and a decent 50mm lens, you could fix the 50mm onto the front of the 200mm with the filter threads facing each other to give a 4:1 magnification ratio which is very high, but the possibilities with this type of arrangement are very good as different combinations can be used to achieve different results. The adapters are cheap too.
So what if you don’t have an SLR or dSLR and can’t add anything in between the body and lens? Well the diopter route is an option and so is the reversing a lens route although you may have to be a bit creative with how to connect the lenses together. See if you camera has a macro mode too, usually a little yellow flower appears on the screen, as that can help you get closer. Several point and shoot cameras are great for macro, especially the Nikon Coolpix 4500 which I used for a while before upgrading to a dSLR.
When you are actually taking the close up shots you will need to keep the camera totally still, so a tripod or a beanbag is essential. You will also need to be patient, especially with insects as they are very quick, so get used to the settings which work best on your camera so you are able to get the shot quickly when you need to.
Macro Photography examples :


No comments:
Post a Comment